Post by Dancing Puffball on Aug 5, 2019 5:00:44 GMT
Set Up:
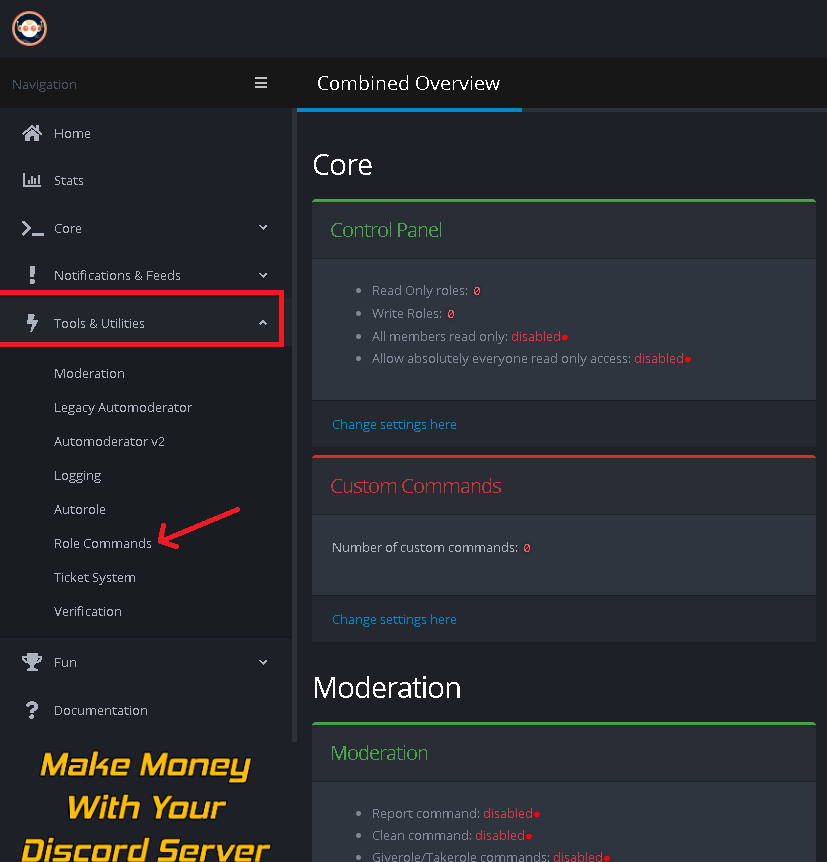
1: After inviting YAGPDB head over to the control panel, select your server from the "Select Server" menu, click "Tools & Utilities" on the left hand side bar and select "Role Commands" from the drop down menu.

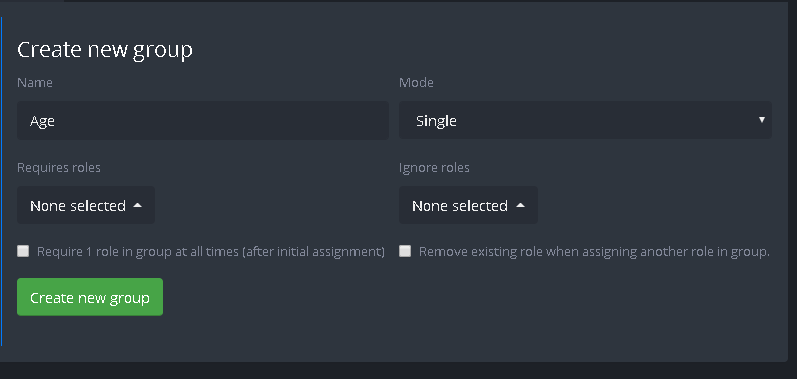
2: First you need to create a role menu category, so let's assume we're creating a menu for Age. In 'Create new group' you would then type 'Age', and for the 'Mode' you would (in this case) select 'Single', as this would allow each user to only select one role option instead of multiple. This is just an example for context. Click 'Create New Group' whenever you're done with whatever it is you're creating. Also keep in mind that if you select 'Mutiple', you are required to set a minimum and a maximum amount of roles allowed, so I recommend you stick to either 'Single' or 'None' as your options.

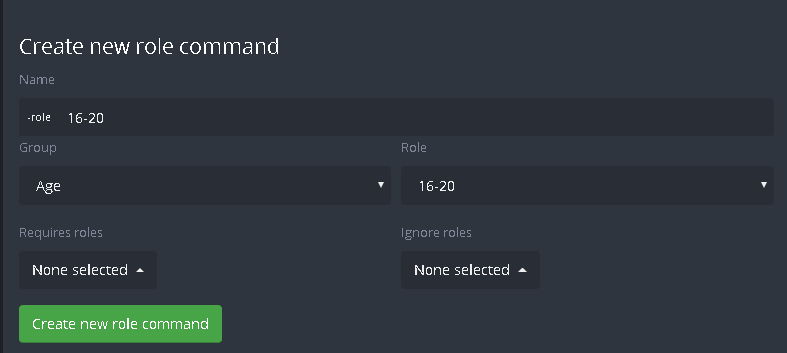
3: Now head to the 'Create new role command' menu to the left, and begin adding the roles you wish to assign to the role menu. Click 'create new role command' when you're done, and the role has been added to the menu. Repeat this step several times until all the roles you wish to add to the role menu have been added.

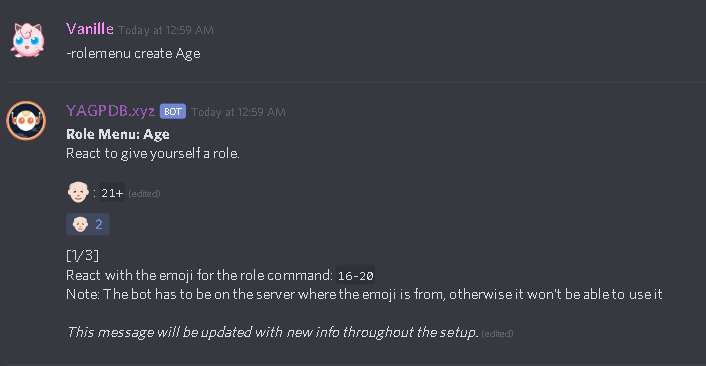
4: Now head back to your server, and type in the following command into your role menu channel. The command you use will depend on your bot's prefix and the name of your role menu. The command for this is " -rolemenu create <Name of group/category>, so within the context of my example category above, we would type '-rolemenu create Age' into the role menu channel.

5: This is the fun part! Add an emoji for users to tap on for each reaction role. Continue to repeat this process until the setup is finished.

That's it! If somehow you're still confused about something related to the setup, please write a post in this thread, or message me on Discord.
1: After inviting YAGPDB head over to the control panel, select your server from the "Select Server" menu, click "Tools & Utilities" on the left hand side bar and select "Role Commands" from the drop down menu.

2: First you need to create a role menu category, so let's assume we're creating a menu for Age. In 'Create new group' you would then type 'Age', and for the 'Mode' you would (in this case) select 'Single', as this would allow each user to only select one role option instead of multiple. This is just an example for context. Click 'Create New Group' whenever you're done with whatever it is you're creating. Also keep in mind that if you select 'Mutiple', you are required to set a minimum and a maximum amount of roles allowed, so I recommend you stick to either 'Single' or 'None' as your options.

3: Now head to the 'Create new role command' menu to the left, and begin adding the roles you wish to assign to the role menu. Click 'create new role command' when you're done, and the role has been added to the menu. Repeat this step several times until all the roles you wish to add to the role menu have been added.

4: Now head back to your server, and type in the following command into your role menu channel. The command you use will depend on your bot's prefix and the name of your role menu. The command for this is " -rolemenu create <Name of group/category>, so within the context of my example category above, we would type '-rolemenu create Age' into the role menu channel.

5: This is the fun part! Add an emoji for users to tap on for each reaction role. Continue to repeat this process until the setup is finished.

That's it! If somehow you're still confused about something related to the setup, please write a post in this thread, or message me on Discord.


